
Tutorial for Editing Darker Toned Sims in GIMP
This is a tutorial I have been meaning to do for a while now. I learned how to basically edit my model’s pictures from watching and reading different tutorials. I needed to learn how since I was participating in Sims Modeling Competitions. None of the tutorials specifically addressed how to edit pictures for dark skinned Sims.
So with what I learned along with my own formula and tricks I found my own groove for my models. I am going to use my model Yana as an example. I don’t profess to be an expert and I haven’t been in a comp in a couple of months, I am also still perfecting my technique. I have made better pictures of Yana, but this is the gist of what I do. This can also be applied to body shots.

First you want to make sure you have a nicely lit picture of your Sim. Yana has on makeup because basically she would have on makeup in a competition and this will be the shot you are submitting after you have edited. I use buydebug lights making sure that the wall lights are pointed directly and angled at my Sim thus picking up all light and shadows on her face/body. It is best to get your Sim in her pose after you have found your light. Some poses will cause your Sim to lose their light so adjust accordingly.
Step one open your unedited picture in GIMP. Proceed to open up your layers box, tool box and tool options if they are not open already. I sometimes have to go to Windows and open up dockable dialogs.

Step 2 I like to use the blur tool in the toolbox to smooth out the skin and the blemishes that you see in a raw image. Depending on how much blur you want to use, use the brush hardness and size that pops up in the tool options side menu. I may play around with how hard I want the brush and I change the size from smaller to larger depending on the area I am editing on my Sim.

You can also scroll down to rate at the bottom of the tool options menu and adjust it. I have increased it to 100 for the blur tool.

Step 3, once you blur your Sim’s skin you want to right click, go to layer and add new layer. Call this layer “smoothing” or whatever you want because this is the airbrushing part.

Step 4. If you are unsure how to match your Sim’s skin tone you can click the eyedropper tool and select an area on your Sim’s skin, their skin color will appear in the foreground color box towards the bottom of your toolbox. (Note for darker skin both Sims and non Sims there are some red and yellow highlights in the skintone) Click on the Change Foreground Color tool. Your Sim’s skin color should be in there. I prefer adding a little more red and yellow along with a bit more saturation. Just subtle changes. You will decide what color you think is best for your Sim, but you don’t want something that is too far off from their natural tone. Once you are happy with the color click ok.

Step 5 once you have your airbrush in your tool options box you can adjust the size and the hardness.

Step 6 airbrush the majority of the skin avoiding the eyes, lips, mouth, nostrils and eyebrows.

Step 7 once you are happy with how much you have airbrushed go to the top of your menu, Filters, Blur, and select Gaussian blur. Here is where you want to adjust the radius. Some people are fine with 10 some use twenty. For Yana’s skin I use 20 and usually repeat this process six to eight times, it really depends on how subtle I want the airbrush effect to look.

Step 8 In your Layers box go to Mode and scroll down and select overlay. You can see a difference immediately. It still may not be where you want it, then you can adjust the opacity to make the effect more subtle. She is a bit lighter in some areas I did not apply the airbrush to. You can always add more airbrushing to areas if you are not happy with your first try. Normally I would go back and correct this, but since this is just a tutorial I won’t.

Step 9. Create another layer calling this one shadowing.

Step 10 select black from your foreground color box and proceed to use the airbrush tool on the darker areas of your Sim’s skin. It doesn’t have to be the areas I have selected, but wherever you see a shadow or think there should be more definition. I have added the shadow to outline Yana’s cheekbones to give them more pop. Once you are done select Gaussian blur again. I only use it about three or four times, sometimes even twice depending on how dark my shadowing was. Most people blur shadowing more for their Sims, but I found it is a bit different for darker toned Sims because you still want the shadowing to pop and be defined without looking too dark.

Step 11 When you are done with the Gaussian blur on your shadow select mode again and select overlay. I have also decreased the opacity. You will want to play around with this until you find something you are comfortable with.

Step 12 Create a new layer (final one!) and call this highlighting.

Step 13 click your foreground colors again and select white. If it is not already in there just adjust your colors until you get a nice clean bright white. Proceed to airbrush the areas on your Sim that have a natural light. Depending on what you like you may not want to highlight some areas such as the forehead, I don’t for every picture, this is just an example. I do like to highlight a little underneath the eye just to make that area pop more because it can tend to be dark sometimes. When you are done highlighting go back to Gaussian blur. For highlighting I may repeat the process three to four times sometimes less. You can also go down to 10 from 20 on the Gaussian radius. I don’t like to use it at 20 too much because I want the highlight to pop on Yana’s skin.

Step 14. Once you are satisfied, same process, go to mode and select overlay. I don’t bring the opacity down too much, maybe to 80 or 75. Again this depends, sometimes highlighting can make it look a little too yellow on the skin and you may want to undo the opacity and set layer mode and repeat the Gaussian blur again and of course go back and select overlay again. You can bring the opacity down as much as you like, but you still want to make sure that the highlight is visible. Again you will want to play around with this until you find the right balance for your Sim.

Step 15 once you are complete, select on your first layer then go to Color, adjust brightness/contrast. This is not necessary unless you want to lighten your picture up a bit. I also mess around with the color curves which you can also find in the color menu although it is not necessary.

Step 16 I next want to sharpen my image. Go to Filters, Enhance and Sharpen. (Use Unsharp mask at your own discretion I would not got past 5) I may adjust from anywhere from 30 to 60, you can do a little more or little less, but I wouldn’t advise too much. Of course you may get little specs left over after you have sharpened your image, but don’t worry you can always use the blur tool again to erase those little spots that sharpening leaves.

Step 17 this is basically it. I would advise exporting your image as PNG for uploading. Again this isn’t my best editing job, for my modeling competition pictures I take more time. There are some things I would change for this picture such as the airbrushing since I did miss some areas. You can always blur over any areas to kind of help blend more if you are still not happy with the finished picture. Just remember to not overuse it because you don’t want to blur out things perhaps like a beauty mark or freckles if your Sim has them. You can always adjust the hardness and rate of the blur if you think it’s too strong. This is pretty much it. I know other people have explained this process in less words, but I am a bit long winded and this is the best way I know how to explain things. I did not take pictures for every single step, but I think I managed to get the most important stuff.
I hope this helps anyone who is interested. Thanks for reading and please feel free to comment or email if you have any questions.
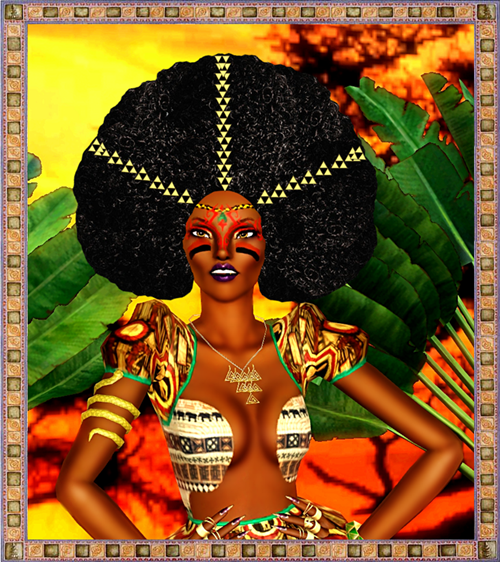
This was one of Yana’s finalist pictures she placed in the top three from a competition I participated in a couple of months ago. It was my first full competition with Yana. I did use the editing method for this picture. I was also using a different skin at the time, but I am now using Cake Face by I Like Teh Sims on Yana and many of my other SIms.

This is the final pic of Yana including a partial body shot.


")


")


")

")


Pingback: Tutorial for Editing Darker Skin Toned Sims in GIMP | Reagan Leeds: Run The World
Thanks so much for this tutorial. It was so informative. This is definitely going to make the editing process easier, and a whole lot more fun. I’ll be sure to use your tutorial from now on.
LikeLike
You’re very welcome, thank you for being so patient. Sorry again it took me so long to do it. Also, when you’re airbrushing you can get closer to the hairline than I did in my pic.
LikeLike
It’s no problem, I know how busy life can get. : )
LikeLike
Thanks. I love your modeling pictures BTW.
LikeLike
Your welcome, and thanks for reblogging them. ^ ^
LikeLike
Pingback: Update To My Skin Picture Editing Tutorial | Reagan Leeds: Run The World
Wow great tutorial! Very nice. I might definitely try to do this 🙂
LikeLike
Wow! Thank you very much!
LikeLike
Pingback: Photo Editing (Software, Apps, 2D Editors) – Reign: A Game of Power